
The complete layout
A van conversion planner that keeps the whole layout together
A bed that fits on a floor plan can still leave no room for a tank, cable run or usable cupboard. Bring those decisions into the same 3D model while your layout is still easy to change.
Example updated . How we make our examples and references
Combine a floor plan with checks in 3D
A sketch helps you compare where the big items go. Use the 3D planner when height, curves and equipment behind the furniture become part of the decision. The worked example below shows the actual interface and its assumptions.
On a narrow screen, scroll the comparison sideways. Each method still needs measurements from your vehicle and the products you select.
| Planning decision | Start with a sketch | Add checks in the 3D planner |
|---|---|---|
| Bed and daily living space | Arrange the bed, kitchen and entrance footprints. Compare daytime and sleeping arrangements. | Inspect the wall shape at mattress height, sitting room above the bed and access beneath it. |
| Insulation and finished headroom | Record the bare dimensions and the material build-ups you intend to add. | Set separate wall, roof and floor thicknesses, then inspect the space occupied by each layer. |
| Furniture beside an arch or wall | Reserve the cabinet footprint and mark the arch position from your measurements. | Review supported wall fitting, arch cutouts, panel edges and openings against the editable reference. |
| Electrical and water equipment | List the equipment sizes and the access space each product needs. | Place equipment and routes alongside the furniture, then fade layers to inspect the space behind it. |
The editable reference geometry supports planning. It does not replace a survey of the van or approve furniture construction, electrical installations or plumbing.
Inside the working planner
See a van build take shape in the planner
Follow a Citroën Relay L3H2 example from the space inside the van to furniture, electrical equipment and water. Each view below comes from the working 3D planner.
This illustrative layout demonstrates the controls. Dimensions, equipment and routes still need checking against your own vehicle and chosen products before building.
-
Choose your van and allow for the finished interior
Start with the matching van family and body size. The guided start opens with van choice, then insulation and flooring, so you can account for the space occupied by those materials before refining the layout.
Enter separate insulation and lining thicknesses for the walls, roof and floor. Inspect the insulation layer in 3D and adjust its transparency to see the occupied space around the reference shell.
Check in your buildMeasure the actual cargo space and record whether your measurements are to bare metal or existing lining. Published maximum dimensions do not describe every point on a curved wall.
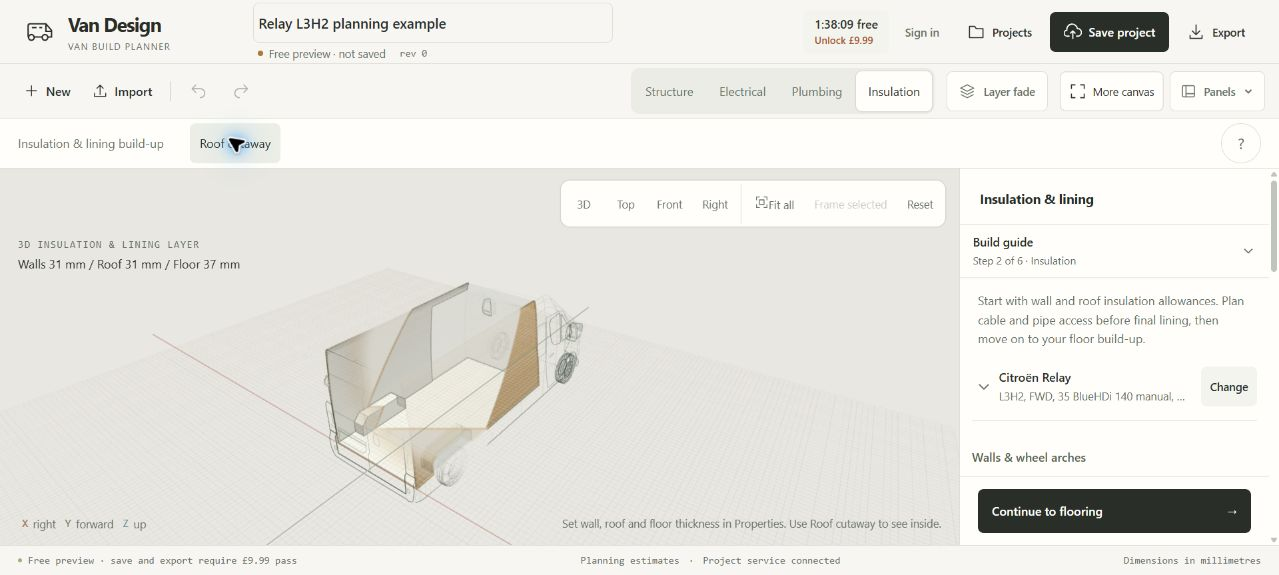
Van choice and material thicknesses establish the planning space for the rest of the build. Example inputs used in this view
- Relay L3H2 cargo reference
- 3,705 × 1,870 × 1,932 mmLength × maximum width × height
- Walls
- 25 + 6 mmInsulation + lining
- Roof
- 25 + 6 mmInsulation + lining
- Floor
- 25 + 12 mmInsulation + lining
- Height after these allowances
- 1,864 mm1,932 − 31 − 37 mm
These are illustrative planning inputs, rather than recommended material thicknesses. The 1,864 mm figure only subtracts the roof and floor build-ups from the nominal cargo height; it is not a measured minimum headroom throughout the van.
-
Reserve space for the things you use every day
Place the bed, kitchen and storage as editable furniture templates. Change their dimensions, then move and rotate them in the same 3D view. The default 50 mm movement and 15 degree rotation snaps help with early adjustments.
Look at the entrance, passage and equipment space together. Supported furniture fitting can shape panel edges beside the van wall and wheel arches while keeping panel thickness consistent.
Check in your buildCheck the route in from the sliding door, the room to sit above the bed and how you will reach items inside storage. Use measurements from your own van to resolve close fits.
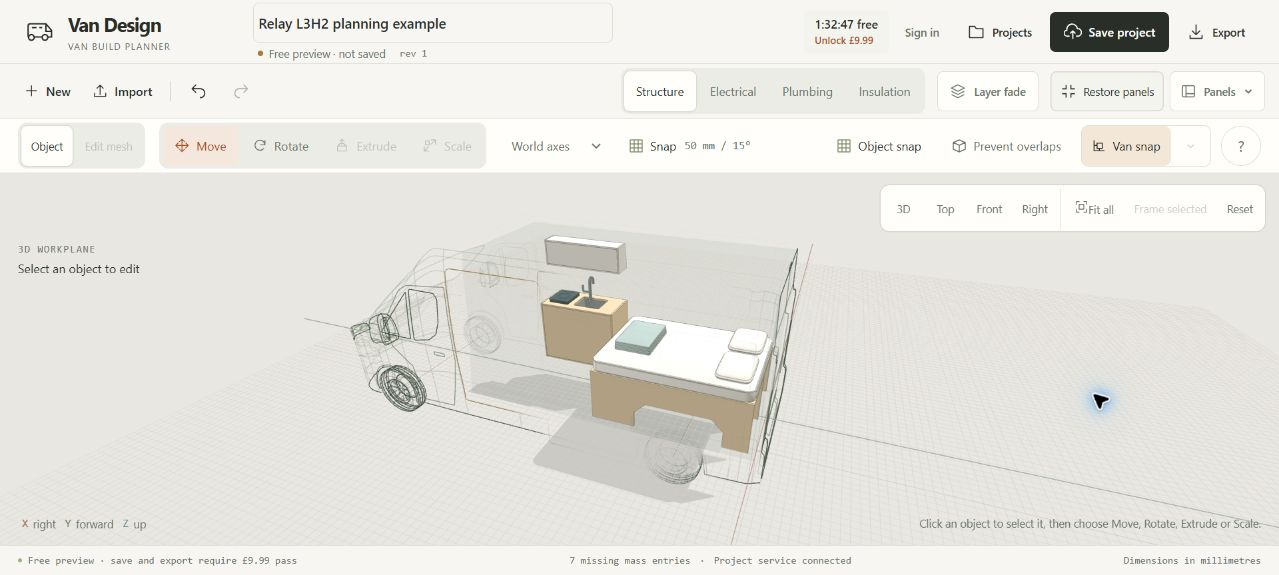
This example uses a 1,350 × 1,900 mm rear bed and a 1,100 × 550 mm kitchen footprint. Revisit the layout as the systems develop. Why this example uses a lengthways bed
The bed in this captured layout has a 1,900 mm sleeping length running along the van. Compare that with the nominal cross-van width before assuming the same bed could turn sideways.
1,870 − 2 × 31 = 1,808 mmMaximum cargo width minus the illustrative 25 mm insulation and 6 mm lining on each side
The 1,900 mm sleeping length is 92 mm longer than this simple width allowance. That is why this example puts the bed length along the van.
The 1,808 mm result is arithmetic using a published maximum width, not a measured clear span at mattress height. Wall curves, ribs, lining and local fittings need checking on the actual van. This comparison does not establish that a mattress or cabinet fits.
-
Put the electrical equipment and its routes in the layout
Switch to the electrical layer and place the equipment you intend to use. Furniture stays visible with adjustable transparency, so you can review the relationship between a battery, electrical board, storage and possible cable routes.
In cable edit mode, start at a terminal and finish at a compatible terminal. Surface guides help influence the route. Review entered equipment ratings and any connection or cable-analysis flags as the system develops.
Check in your buildLeave room for connections and access around the equipment. Check the chosen products and installation conditions separately; the planner’s calculations do not certify an electrical installation.
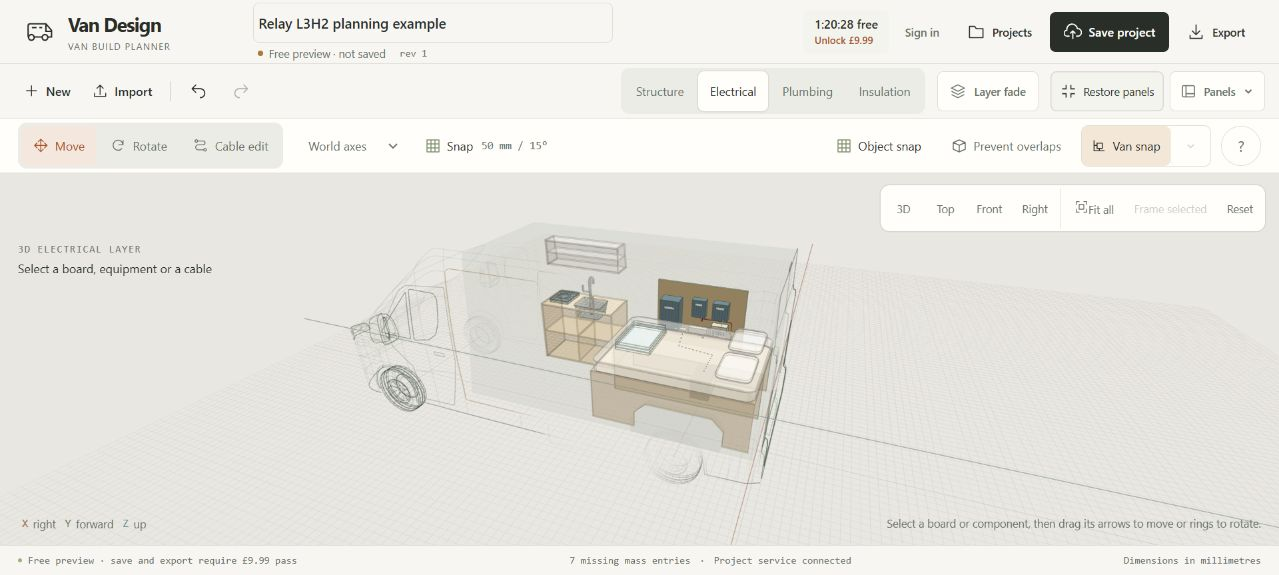
Electrical components share the layout with the furniture. The example has incomplete connections to review; it is a work in progress. -
Make room for water storage, equipment and pipes
Use the plumbing layer to place fresh and grey water tanks, a pump, heater and other water-system components. Compare their planning envelopes with the furniture and the space you want to keep for belongings.
Connect compatible ports and add pipe waypoints to describe the route. Cold, hot and waste services are distinct, and the system overview keeps the recorded tank capacities and drawn pipe lengths together.
Check in your buildConsider how you will fill, drain and reach the system for maintenance. Verify fittings, drain fall, mounting and the selected equipment’s instructions before installation.
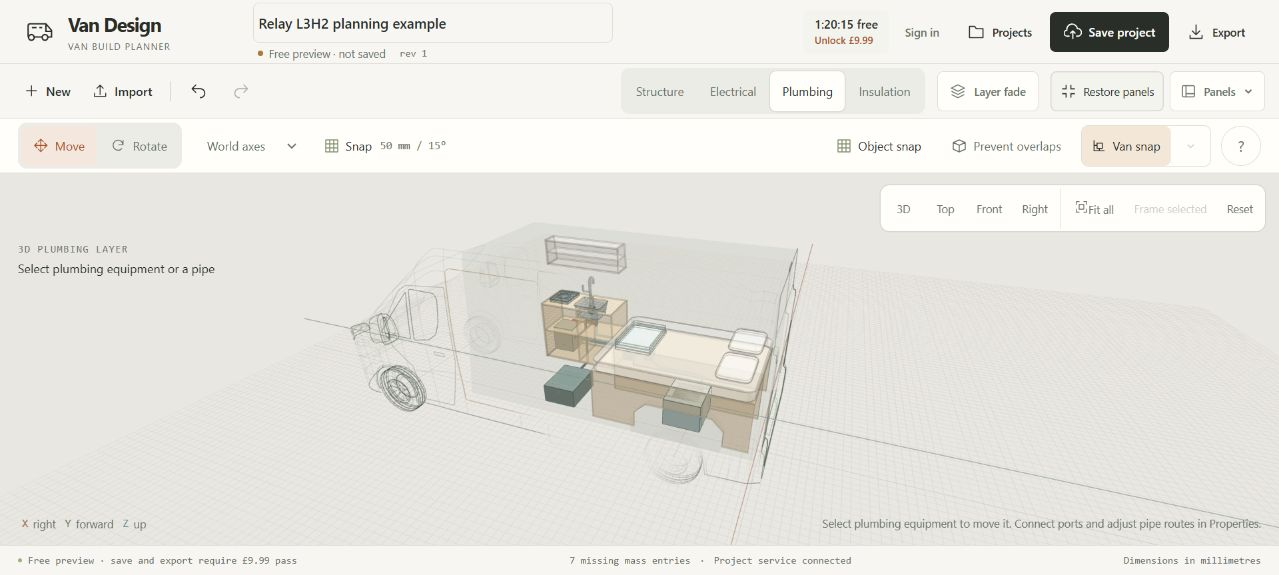
Water equipment occupies space inside the build. Incomplete connections in this example remain visible for review.
Start with your own van
The build guide takes you through each stage, with the option to return as your plans change.
Start with the space you actually have
The guided start begins with your van, then takes you through insulation, flooring, electrics, plumbing and furniture. For a quicker first layout, choose Starting layouts in Build tools and adjust its editable furniture. Available layouts depend on the reference body size. Check the reference against your vehicle and include insulation and lining before refining a close fit.
Add the largest items first: a bed platform, kitchen base, seating or storage. Move and rotate them in the viewport or enter dimensions directly. The default 50 mm movement and 15 degree rotation snaps help you make controlled adjustments, while object snapping helps align nearby faces and edges.
Develop the layout around its systems
Place electrical and plumbing equipment in dedicated layers without removing your furniture from view. Fade inactive layers to inspect routes through a busy section of the build. Overlap highlights help identify objects that need attention, and supported wall fitting lets you explore cabinetry beside curved walls and wheel arches.
Try changes with Undo available, then open Notes & alternatives to keep measurements, notes and small alternative layouts. A paid build can be saved to your account and downloaded as editable JSON, visual OBJ geometry, parts and systems CSVs, a dimensioned planning PDF or supported nominal panel outlines in DXF.
Turn a promising layout into measurements to verify
Pick two model surfaces with Measure to inspect the straight-line distance and separate X, Y and Z spans. Keep a named measurement for later review. These are fixed-coordinate checks against planning geometry; recheck them after changing the layout and on the real vehicle.
Keep the weight and budget with the layout
The whole-build ledger brings modelled furniture, electrical and water equipment, insulation/lining and manual purchases into one list. Enter actual masses, estimated and paid prices, quantities and purchase status. Missing values stay visible; waste and contingency affect the budget rather than installed weight.
Loading scenarios combine a measured vehicle baseline with added occupants, luggage, fuel and tank-water changes. Payload and static axle estimates need complete entered masses, actual axle readings and positions. These are planning estimates, not a weighbridge result or a vehicle-compliance decision.
Bring your own equipment and share a clear review
Import local OBJ or STL surfaces after checking units and resulting dimensions. Imported geometry has no automatic construction, mass, cost or connection data. Colour and illustrative material finishes, approximate seated/standing views and paid PNG downloads help you discuss the layout.
Keep private notes and small layout alternatives inside your project. A saved paid build can also have a live view-only link with optional reviewer comments. You control whether feedback is enabled; people with that link can read comments posted to it. AI rendering is not enabled.
Bring the rest of your build into the plan.
Explore how each layer works before trying it in your own van.